Wednesday, November 19, 2014

Understanding 6502 assembly on the Commodore 64 - (9) The Hexadecimal Conundrum

Its time, now to take a step back and look at some very important things in out last program.  It would seem that the simplicity of this particular program allowed us to overlook what is an inevitable coding issue.  This of course, was done intentionally, as I've stated, to make the easiest to read program, whist sacrificing other things in return.


Click here for Chapter 9

Understanding 6502 assembly on the Commodore 64 - (8) Inputs in Assembly

Lets continue with our wonderful Commodore logo, we will use the code from the last chapters but we will stop after the creation of the sprite.  Ill include the code below to plug into Relaunch64.  By taking advantage of some more kernel functions, we can make the program a bit more interactive.


Click here for Chapter 8

Tuesday, November 18, 2014

Understanding 6502 assembly on the Commodore 64 - (7) The Assembler and Machine code Compiling

So what happened when the compiler ran??  It took our assembly code and converted it into machine code and stored it in a prg File that the commodore could read.  The commodore loaded the file, where it was instructed to, starting at C000.

Lets see what the code looks like, waiting to be executed


Click here for Chapter 7

Understanding 6502 assembly on the Commodore 64 - (6) Our instructions to assembly

In chapter 3 we listed all of the instructions we had done with regard to memory modification to achieve or goal.  Today we will convert those instructions into assembly and then onward to machine code where the C64 can understand it and execute the tasks.


Click here for Chapter 6


Understanding 6502 assembly on the Commodore 64 - (5) DEVTOOLS

In is post we briefly move away from the code work to set up our development tools.


Click here for Chapter 5

Understanding 6502 assembly on the Commodore 64 - (4) RECAP AND DEVTOOLS INTRO

There is no greater method, to study the inner workings of the the C64 than that which was demonstrated in the previous posts.  The ability to modify memory addresses in real time simply cannot be matched.

We watched how, not a computer program, but a human being executed a series of instructions on a computer, achieved a desired output.  Lets look at our instructions in order.


Click here for Chapter 4

Monday, November 17, 2014

Understanding 6502 assembly on the Commodore 64 - (3) Messing with Memory

Memory areas $0400 $07E7 are mapped to the screen memory, starting at the top left of the screen to the bottom right.  To keep the demonstration out of the way of the working area, we'll work down at memory address $0708 which is in the middle towards the bottom.


Click here for Chapter 3

Friday, November 14, 2014

Understanding 6502 assembly on the Commodore 64 - (2) Memory Mapped Hardware

     Theres a million different different resources for learning 6502 Assembly, but what does it do? Any why?  There is a logical order for learning this, Its not like learning C++ or Perl or PHP.

     A 6502 in a Commodore is the same as in an Apple II is the same as in an Atari 800, etc etc.   Assuming that these units did not have some sort of upgrade, such as the enhancement kit of the apple //e.


Click here for Chapter 2

Thursday, November 13, 2014

Understanding 6502 assembly on the Commodore 64 - (1) Intro

      With all computers,  there are only two catagories that a user falls into at any given time.  Writing software and using software.  Really, not much has changed with regard to that even today.

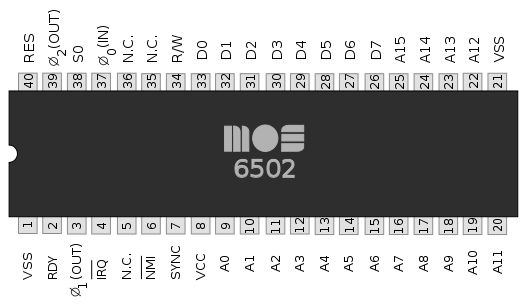
    Having only 4000+ transistors means programming the 6502 with regard to speed and available memory means Assembly is an obvious choice to develop software. The Commodore is a great computer to learn 6502 machine code.  Between all of my 6502 computers, my choice is the C64


Click here for Chapter 1


Apple ][GS Battery Swap

I got lucky on this one,   the computer spent about 20 years in an attic in Georgia, it had the old style battery soldered on the board that thankfully didn't rupture.


Dont purchase expensive replacement kits on Ebay.   This should cost you less than 10$


This was all available at Radio Shack.  3.6v Lithium battery and a AA holder


Here the old battery is still installed, luckily it didn't leak (date code August 1988)


Soldered new wires in and mounted the holder off to the side under the power supply


Back in business


SD2IEC What you need to know BEFORE you buy!

     I was so excited when after two years a new software update for the SD2IEC came out.   Most importantly because it purportedly included multitask support without having the write the swap list file for each one.   As of Oct 28 SD2IEC.DE now lists the current binary as 1.0.0alpha0.84.

But you won't find me upgrading........


     Why do you ask? Because I had the misfortune of buying my SD2IEC for a less than reputable dealer on eBay.  As a value added convenience he decided not to burden me with a boot loader.  

So Instead of simply putting the new BIN onto the SD card and upgrading, I will now have to purchase hardware to write to the chip.

But wait, theres more.    His design left no connector to write to the chip , I imagine he just programmes them and shoves them in the box.

So now Ill have to get this going on a breadboard and buy parts off eBay to do a software upgrade

when I raised the issue with despegatop about not upgrading, he wrote

Hi, 

Put the new file on the root directory of the sd card.

In any case, if you have any issue you can send back the device for reprogramming.

Best regards


Then I pressed him on the lack of a boot loader

I checked with other people in the commodore forums. You know this will not upgrade becuase you have not been adding the bootloader. Will you be paying the round trip shipping for me to send my device back to spain because you for got to do something correctly?


 and he responded with

I currently make non-upgradeable units via sd card because it is much more reliable from full accidental erasure.

I can only pay the return postage (from Spain to USA)

Best regards


So, If you feel like ordering from despegatop you had better be sure he includes it before buying


This is an example currently for sale with NO boot loader


Easy Tape to Disk conversion using Vice, AKA T64 to D64

You do not need any other software beyond Vice and its included application,  c1541, to convert tape to disk. Actually, you don't even need Vice.   All of this can be done with C1541 which is included with Vice


Step 1:   Create a blank disk in Vice

The Save As is the file you will be creating, the Name is what the commodore would see as the disk name.  The linux version and some other versions may ask for a value for index, make it 00 (zero zero).   See Step 9 for creating images in c1541 WITHOUT vice


Step 2: Load C1541


Step 3: Mount the new d64 file in C1541 with attach filename.d64, then type list to view it


Step 4: Dump a tape to the d64 image with tape filename.t64, then list to view it


Step 5: Dump another (space permitting), then list


Step 6: It would seem moon patrols image shows the file name to be file.prg which won't be very useful.  So lets change it using rename oldfilename newfilename


Step 7: Maybe you added a file and didn't wish to have it in your d64 image.... you can delete it with delete filename


Step 8: Maybe you don't want the disk called TAPETODISK on the C64 and want to rename the disk itself to favetapes.    use name newname,00


Step 9: Truth be told, you do not even need vice to create disks, you can just use C1541 to to this.  Lets create a disk image called sampledisk with an index of 00 using a real file name called sample.d64 , format it and mount it in drive 8 under c1541. Then run list


sample.d64 will be created in the current directory that c1541 was executed


type quit, and you are finished, attach the d64 to your emulator or image it to disk or sd2iec or whatever


Tuesday, November 11, 2014

1541 testing , heat sink vs, no heat sink


I conducted 1541 heat testing today, heatsink vs no heatsink. No heatsink measured at the middle of each IC, and with heatsink the avg of both sides where the heatsink meets the IC, the difference is staggering. Naturally there will be people who will say that somehow this was measured wrong, thats fine. Ive found that each chip between the middle point and 25% offset to be no more than 1 degree off. Measured off the same points over the same intervals, its clear the heat must be going somewhere. If I were wrong, then the heatsink would be asking like an insulator, increasing the temperature of the chip


With heatsinks. IC#5 would probably benefit if the 2 heatsinks were offset about 4mm to the left from what is shown in the photo


Dialup Acoustic coupler modem

Resurrecting the Acoustic coupler from the dead, I've employed a 2 line rotary switch between two old bell system phones to connect the Apple IIe to the linux server.


Wednesday, June 25, 2014

6502 Revisited


Its time to revisit the 6502 with a cool assembly project.  Perhaps a program connecting the FT-817 to the Commodore via serial? We shall see...


Check the Ultimate commodore resource

http://www.bombjack.org/commodore/ 

Time Lapse trip from Florida to Mississippi

Heres the video I posted on Youtube from the motorcycle trip from Central Florida to Biloxi MS

See the video here

Monday, May 12, 2014

LM-2 Upgrades for AFM Shovelhead

Old technology meets new as the Shovelhead has the LM-2 kit added to monitor AFR


See more here..... 

Thursday, May 8, 2014

VSTAR Maxair Preditor Pro kit installation


2001 VSTAR 1100 Gets an Upgrade, Maxair preditor pro POD kit

See more here

Friday, May 2, 2014

Commodore 64 BBS days.....

Our "Internet" in the 1980's.    Connection done via TCP/IP

Movie Here!!

Thursday, May 1, 2014

Nature day! Did a good deed.

This morning, after hearing last nights commotion, i looked in the swimming pool and found
hundreds upon hundreds of frog eggs which is from a species of concern here in Florida.  This was the first time I hit the emergency kill button, that shuts down the pumps and blows the pressure cap off the DE filter. (normally used when a kid gets stuck to the button of a pool) I Then collected every single egg in the pool and put it into a bucket which I PH balanced (HCL).  As luck would have it, I forgot to shock the pool last night and I was running nylon mesh basket covers, so several hundred more were saved. Im contacting the nature organization in Winter Garden to transfer it over to them.

See More